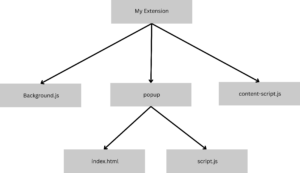
In this article, we will discuss how to create an extension. This article will include all the essential information about the necessary files for developing an extension. We have tried to brief you from Novice to Pro. We have also shared the 5 steps with a sample project through which you can explore the extensions.
Browser Extensions
Browser Extension provides an extensible functionality to perform a specific task. It allows the users to bring a customized browsing experience and enhance web applications.
How to Create a Chrome Extension
After reading this article you will create an extension in just a few steps. At the end of the article, we have also attached the code for our image capture extension but to implement it you must read each context of the extension and its purpose.
First, we will discuss all the essential files required to create your Chrome extension and their use cases.
Manifest.json
Manifest.json is the first thing that is checked by the browser, this file contains all essential information about your extension such as your extension name, file routes, and permission which are required by your extension.
{
    "manifest_version": 3,
    "name": "My Chrome Extension",
    "version": "1.0",
    "description": "A Chrome extension with TypeScript and Webpack",
    "permissions": [
        "idle",
        "alarms",
        "management",
        "scripting",
        "activeTab"
    ],
    "background": {
        "service_worker": "dist/background.js"
    },
    "content_scripts": [
        {
            "matches": [
                "http://127.0.0.1:5500/frontend/index.html"
            ],
            "js": [
                "dist/contentScript.js"
            ]
        }
    ],
    "action": {
        "default_popup": "popup/index.html"
    }
}
In the above example, we have given routes for our background.js, content-script.js, and our popup HTML file. We have also added the routes on which our content.js file should be executed.
Background.js
As per its name, background.js refers to a service worker who works in the browser’s background. Background.js brings a wide range of capabilities such as browser monitoring, script execution, chrome tab creation & removal, screen capturing, and more.
Content.js
Content.js is the javascript file that is executed in the tabs for instance, when a user opens a webpage if I open up my console I can see that my extension content-script will is also executed in it, the main purpose of this file is to communicate with the background service as with changes in the tab we can alert the background service and return action/message that our extension need to perform.
Popup.html
Popup.html helps developers in creating the UI of their extension. Whenever you click on the extension you see a box that gives you information/details about your extension or you can start or stop the extension service. Extension UI is completed and developed in this file you can also add a script and CSS files for better management.
Sample Project
- Create a manifest.json file, we have shared the example above.
- Create a popup folder and add the index.html file and script.js file.
- Open your browser and go to chrome://extensions/.
- You will see developer mode on the right corner, and toggle it.
- Click on the Load unpacked and select the folder.

popup/index.html
<!DOCTYPE html>    <html>
<head>
<title>Screenshot</title>
<style>
img { width: 100%; }
</style>
</head>
<body>
<button id="captureBtn">Take Screenshot</button>
<div id="screenshotContainer"></div>
<script src="script.js"></script>
</body>
</html>
script.js
document.querySelector('#captureBtn').addEventListener('click', async () => {
    const [tab] = await chrome.tabs.query({ active: true, currentWindow: true });
    const screenshot = await chrome.tabs.captureVisibleTab(tab.windowId);
    const img = document.createElement('img');
    img.src = screenshot;
    document.body.appendChild(img);
});
In this sample project, we have used poupup.html and script.js, As we don’t have to use content-script and background.js. In our case, we don’t require a background service worker for capturing screen and we don’t need javascript to be loaded in my tabs.
In conclusion, we have tried our best to explain how to create an extension you can use our code to create an extension and explore more with the information we have provided in our article. To learn more about extension capabilities and functions please visit developer.chrome.com.
You can also read our articles General.

